Disclaimer: This example was presented during the Laravel Paris Meetup on November 7th 2018, you can watch the video here.
Zenaton is about giving everyone the ability to build complex workflows in an easy way. Today we will use PHP and the Laravel framework to implement a purchase workflow for Amazon Dash buttons. If you need an introduction to Zenaton before diving into this use case, you can read the business introduction and technical introduction that we’ve already published.
Amazon Dash buttons are small physical buttons that you can buy from Amazon. Each button is dedicated to the purchase of one specific product. You press it, it orders the product from Amazon. Because this device only provides one way to interact with it, many things will happen in the background when you press it, and so there are many possible results to handle. This is a use case that can be implemented elegantly using Zenaton.

Pressing the Button
Before we start coding our workflow, let’s explain how the button works. This is likely different from how an Amazon Dash button really works.
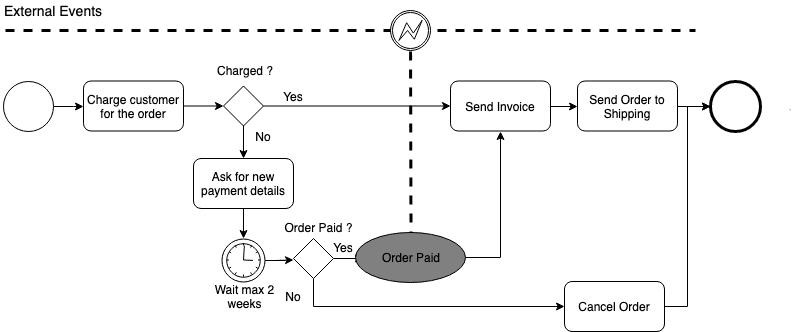
The flowchart of the workflow can be represented like this :

We will assume that after having configured the button, it is able to send an HTTP request to an eCommerce website. The request will have a customer identifier and the product reference to be ordered. The customer’s account is already set up with some saved payment information to use when the button is pressed.
The HTTP request will hit the backend servers of the eCommerce website. A new purchase order will be created for the customer who owns the button and it will be persisted in a database. Finally, a Zenaton workflow will be started.
<?php
namespace App\Http\Controllers;
use App\Product;
use App\Repositories\OrderRepository;
use App\User;
use App\Workflows\OrderFromDashButtonWorkflow;
use Illuminate\Http\Request;
use Illuminate\Http\Response;
final class OrderFromDashButtonAction extends Controller
{
    public function __invoke(Request $request, OrderRepository $orderRepository): Response
    {
        $user = User::find((int) $request->header('X-User-Id'));
        abort_unless($user, 403);

        $product = Product::find((int) $request->json('product_id'));
        abort_unless($product, 400);

        $order = $orderRepository->createDashOrder($user, $product, $request->json('quantity', 1));

        (new OrderFromDashButtonWorkflow($order))->dispatch();

        return response($order, 201);
    }
}
Action that will handle the HTTP request coming from the button.
Calling dispatch on a workflow instance will start the execution of the workflow by one of the available Zenaton Agents.
Implementing the tasks
Now that we have the action to handle the HTTP request coming from the Dash button, we need to implement the workflow. The major steps will be:
- First, we will try to charge the customer for the purchase they made. If the payment succeeded using the customer’s saved payment information, then we are able to send an invoice and deliver the product.
- If the payment failed, we need to ask for new payment information from the customer. We will send them an email with a link to fill in the new payment information. This payment information will be used to pay for the order. The customer has 14 days to give valid payment information.
- If the customer does not give new payment information within 14 days, the order will be canceled.
Zenaton uses the concept of “tasks” to define an action happening inside a workflow. Let’s see how we can implement the tasks we need for our workflow.
Task: Charge customer for the order
Tasks are PHP classes implementing the TaskInterface and using the Zenatonable trait. The first task to implement will be responsible for issuing a charge to the customer. Here, we will assume that we have a Payment service object that is able, from an order, to retrieve the price to pay and the customer’s saved payment information, and use these to issue a charge using a payment system provider that will synchronously return a result.
This task could look like this:
<?php
namespace App\Tasks;
use App\Order;
use App\Repositories\OrderRepository;
use App\Services\Payment;
use Illuminate\Support\Facades\App;
use Zenaton\Interfaces\TaskInterface;
use Zenaton\Traits\Zenatonable;
final class ChargeCustomerForOrderTask implements TaskInterface
{
    use Zenatonable;
    /** @var Order */
    private $order;
    public function __construct(Order $order)
    {
        $this->order = $order;
    }
    public function handle()
    {
        /** @var Payment $psp */
        $psp = App::make(Payment::class);
        $isCharged = $psp->chargeCustomerForOrder($this->order);
        /** @var OrderRepository $repository */
        $repository = App::make(OrderRepository::class);
        $repository->setOrderPaid($this->order, $isCharged);
        return $isCharged;
    }
}
Task: Asking for new payment information
When the first task fails, we will have to ask the user for new payment information. Here, we will send a simple email to the customer, containing a link to a webpage where they will be able to enter new payment information:
<?php
namespace App\Tasks;
use App\Order;
use App\Repositories\OrderRepository;
use Illuminate\Support\Facades\App;
use Zenaton\Interfaces\TaskInterface;
use Zenaton\Traits\Zenatonable;
final class CancelOrderTask implements TaskInterface
{
    use Zenatonable;
    /** @var Order */
    private $order;
    public function __construct(Order $order)
    {
        $this->order = $order;
    }
    public function handle()
    {
        /** @var OrderRepository $repository */
        $repository = App::make(OrderRepository::class);
        $repository->cancelOrder($this->order);
    }
}
Tasks: Send order invoice & send order to shipping
If everything went well with the payment, we will need to send an invoice and also inform the warehouse so that it can proceed with the delivery. In this example, we will simply send an email for the invoice.
<?php
namespace App\Tasks;
use App\Order;
use App\Repositories\OrderRepository;
use Illuminate\Support\Facades\App;
use Zenaton\Interfaces\TaskInterface;
use Zenaton\Traits\Zenatonable;
final class CancelOrderTask implements TaskInterface
{
    use Zenatonable;
    /** @var Order */
    private $order;
    public function __construct(Order $order)
    {
        $this->order = $order;
    }
    public function handle()
    {
        /** @var OrderRepository $repository */
        $repository = App::make(OrderRepository::class);
        $repository->cancelOrder($this->order);
    }
}
Task: Cancel Order
The last task we need is the one that will take care of canceling the order when we fail to issue a charge to the customer and they don’t provide new payment information within 14 days.
Now we have every task we need. We can start implementing the workflow, which will execute the tasks in order. You will notice that a task can depend on the result of another.
<?php
namespace App\Tasks;
use App\Order;
use App\Repositories\OrderRepository;
use Illuminate\Support\Facades\App;
use Zenaton\Interfaces\TaskInterface;
use Zenaton\Traits\Zenatonable;
final class CancelOrderTask implements TaskInterface
{
    use Zenatonable;
    /** @var Order */
    private $order;
    public function __construct(Order $order)
    {
        $this->order = $order;
    }
    public function handle()
    {
        /** @var OrderRepository $repository */
        $repository = App::make(OrderRepository::class);
        $repository->cancelOrder($this->order);
    }
}
Implementing the workflow
Orchestration of tasks in Zenaton is done by implementing a workflow, which is a simple PHP class implementing WorkflowInterface and using the Zenatonable trait. Being able to code workflows using a programming language gives a lot of possibilities: executing tasks synchronously or asynchronously, using their results to make decisions about what to do next using if statements, and many more. We can even use loops!
Now let’s implement our workflow:
<?php
namespace App\Workflows;
use App\Events\OrderPaid;
use App\Order;
use App\Tasks\AskForNewPaymentDetailsTask;
use App\Tasks\CancelOrderTask;
use App\Tasks\ChargeCustomerForOrderTask;
use App\Tasks\SendOrderInvoiceTask;
use App\Tasks\SendOrderToShippingTask;
use Zenaton\Interfaces\WorkflowInterface;
use Zenaton\Tasks\Wait;
use Zenaton\Traits\Zenatonable;
final class OrderFromDashButtonWorkflow implements WorkflowInterface
{
    use Zenatonable;
    /** @var Order */
    private $order;
    public function __construct(Order $order)
    {
        $this->order = $order;
    }
    public function handle()
    {
        // We try to issue a charge to the customer
        $isCharged = (new ChargeCustomerForOrderTask($this->order))->execute();

        $event = null;
        if (!$isCharged) {
            // We could not charge the customer using it's saved payment information, let's ask for new ones
            (new AskForNewPaymentDetailsTask($this->order))->dispatch();

            // Now we wait until the customer enters some valid payment information on the website
            $event = (new Wait(OrderPaid::class))->days(14)->execute();
        }
        if ($isCharged || $event) {
            // Order was charged from saved payment details or paid by the customer using payment form,
            // we can now send the invoice and deliver it!
            (new SendOrderInvoiceTask($this->order))->dispatch();
            (new SendOrderToShippingTask($this->order))->dispatch();
        } else {
            // We could not get valid payment information from the customer within 14 days, the order is canceled
            (new CancelOrderTask($this->order))->dispatch();
        }
    }
    public function getId()
    {
        return $this->order->id;
    }
}
The handle method is only 20 lines of code, comments included, but it does exactly what we want:
- First, the task
ChargeCustomerForOrderTaskis executed. It returns whether or not issuing a charge to the customer was successful. - If the result is
false, then wedispatchthe taskAskForNewPaymentDetailsTask. Dispatching a task means that the workflow can continue without waiting for the end of the task execution because we don’t need the value returned by the task. - Then we wait for event
OrderPaidto be sent. This event is sent by the website when the customer provides valid payment information. - The last part of the workflow is about delivering the order or canceling it. If the order is successfully paid for, either because we issued a charge using the customer saved payment information or because the customer provided new valid payment information within 14 days, then we can send the invoice and deliver the order. Otherwise, it means the customer failed to provide valid payment information in time: the order is canceled.
Writing this workflow class is all it takes to have:
- A fully functional workflow holding some state without the need for a database, being able to wait for a time or for external events to happen without the need for CRON jobs.
- Scalability: the workflow and tasks are all distributed on available Zenaton Agents. No queuing system needed, no need to think about messages, we take care of everything. You just write PHP code.
- Parallelism: tasks
SendOrderInvoiceTaskandSendOrderToShippingTaskare able to run at the same time because we don’t need to return the value of the first one to execute the second one. - Conditions: You can use the workflow state or values returned from tasks to change the execution of the workflow using
ifstatements.
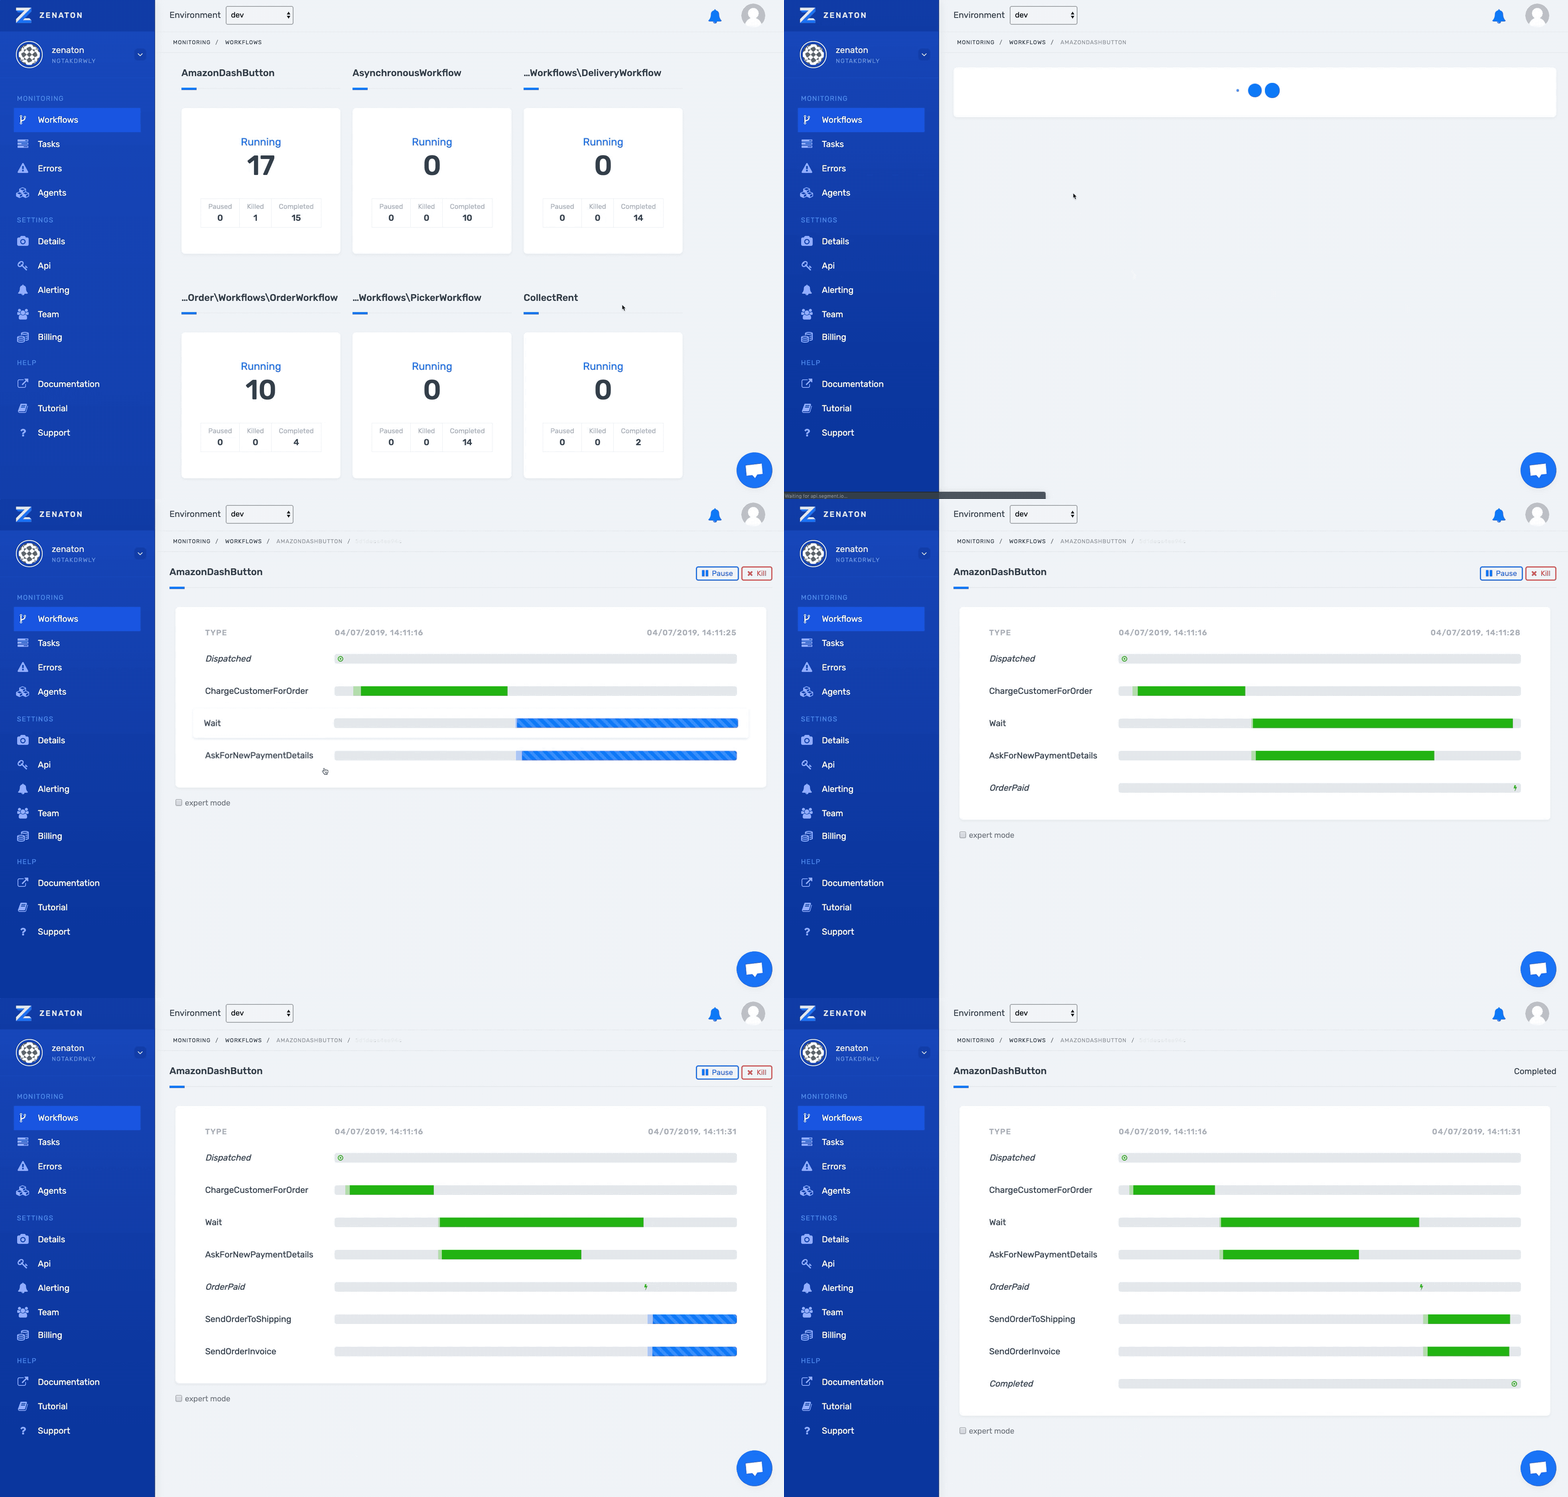
After launching this workflow, you can observe in real time task executions on the Zenaton dashboard. It looks like :

Try it!
If you want to play with this example, you can check out the full implementation in a real Laravel project. You will need a Zenaton account to run it. You can register for free, no credit card required.
You can also try the tutorial to discover the features of Zenaton. It will give you a good insight into what is possible. Then you can start experimenting with your own workflows.
If you have any questions, feedback, or if you need a little help to implement your workflows, feel free to get in touch with us in the comments below, on Twitter, or using the chat on our website. We will be happy to help.
