View the project on github where you can fork it and make it your own and deploy to heroku in a few clicks.
What you will learn
- Transform data inside workflow code
- Receive and react to events
- How the onEvent function works alongside the handle function
Description
The workflow launches when a shopper adds their first item to their cart and then, if they do not check out within the wait time, sends a series of communications to re-engage the shopper. The notifications include an in-app notification, an email reminder, and an email with a discount code. The shopper's user profile is updated each time a notification is sent.
Workflow Overview
This is the basic structure of a Zenaton workflow:
The handle function is the main function of the workflow. It contains your workflow's logic.
We will use the onEvent function for this workflow to react to external events.
Note: The functions you see are plain javascript. We've added the * due to the generators
Workflow steps
The workflow instance will launch when the customer adds the first item to their cart.
- The workflow waits for the checkout event for a specified amount of time. The checkout event is sent from the application using the Zenaton API when the customer checks out.
- If they don't checkout after a certain amount of time, an in-app notification is sent.
- Then the workflow waits again for the checkup event for a specified amount of time.
- If they still don't checkout, the workflow will send an email reminder.
- Finally, the workflow will send a discount code by email.
There will be 3 waiting phases, with different durations and associated notifications:
- after duration1, send an in-app reminder notification
- after duration2, send an email reminder
- after duration3, send an email with a discount code
At any point in time, once the "checkout" event is received the workflow instance stops.
onEvent function
The onEvent function is very useful when you want to achieve complex event-based logic. In this workflow, while the main handle function is waiting for the "checkout" event, the workflow execution is suspended.
But it can still react to events in the meantime by using the onEvent function.
In this workflow, we will use it to react to the "updateCart" event to keep the cart property updated so that when the customer receives reminder notifications, the workflow will have the latest version of the cart to include relevant details of their cart contents in the email text.
1) Launch the workflow
A workflow instance is launched when a shopper adds the first item to their cart.
The workflow instance will be started using the first item as an input parameter and the customer's email address.
{
  "email": "[email protected]",
  "cart_id": 123,
  "items": [
    {"sku": 456, "name": "item_1"}
  ]
}
Workflow Code
const { duration } = require("zenaton");

const duration_before_email = duration.minutes(20);
const duration_before_discount = duration.days(3);

module.exports = {
  // the 'handle' generator function is the main function for the workflow execution and describes what needs to be done
  // in this workflow.
  *handle(cart) {
    // we store the cart as a property of the workflow. this will be useful to make the 'onEvent' function update the cart
    // and have changes reflected in the 'handle' function.
    this.cart = cart;

    // wait for 'duration_before_email' seconds.
    yield this.wait.for(duration_before_email);

    // send an email reminder to them so they can complete their order before the cart expires.
    yield this.run.task("SendReminder", this.cart);

    // wait for 'duration_before_discount' seconds.
    yield this.wait.for(duration_before_discount);

    // send a discount code by email to add some incentive.
    yield this.run.task("SendDiscount", this.cart);

    // end of the workflow.
  },
  // the 'onEvent' function is executed everytime the workflow is receiving an event.
  *onEvent(name, data) {
    // when the event name is 'cartUpdated', we update the cart stored as a workflow property.
    // this allows you to change the workflow depending on the content of the cart if you want to.
    if (name === "cartUpdated") {
      this.cart = { ...this.cart, items: data.items };
    }
    // when the event name is 'checkout', we immediately terminate the workflow.
    if (name === "checkout") {
      // note: we could add notifications or some other tasks before terminating
      this.terminate();
    }
  }
};
The workflow will start by waiting for the "checkout" event for up to a configurable duration.
If the event is received before this duration, the workflow will stop.
But if the event is not received before this duration passes, the sendNotification function will be triggered.
To see it in action, you can launch a workflow instance within your application code using HTTP or using the Node.js SDK.
curl -X POST https://gateway.zenaton.com/rest-api/v1/instances \
  -H "Content-Type: application/json" \
  -H "Accept: application/json" \
  -H "app-env: dev" \
  -H "app-id: FBKTJXUMLO" \
  -H "api-token: Bt29HVlvrY9atH41LNwnAp5MQYkEut8oCqXKH8NGOjUAtJltB6Sea82FbP2P" \
  -d '{"name":"AbandonedCart","input":[{"email":"[email protected]","cart_id":123,"items":[{"sku":456,"name":"item_1"}]}],"version":"v1"}'
View the project on github where you can fork it and make it your own and deploy to heroku in a few clicks.
Workflow Executions
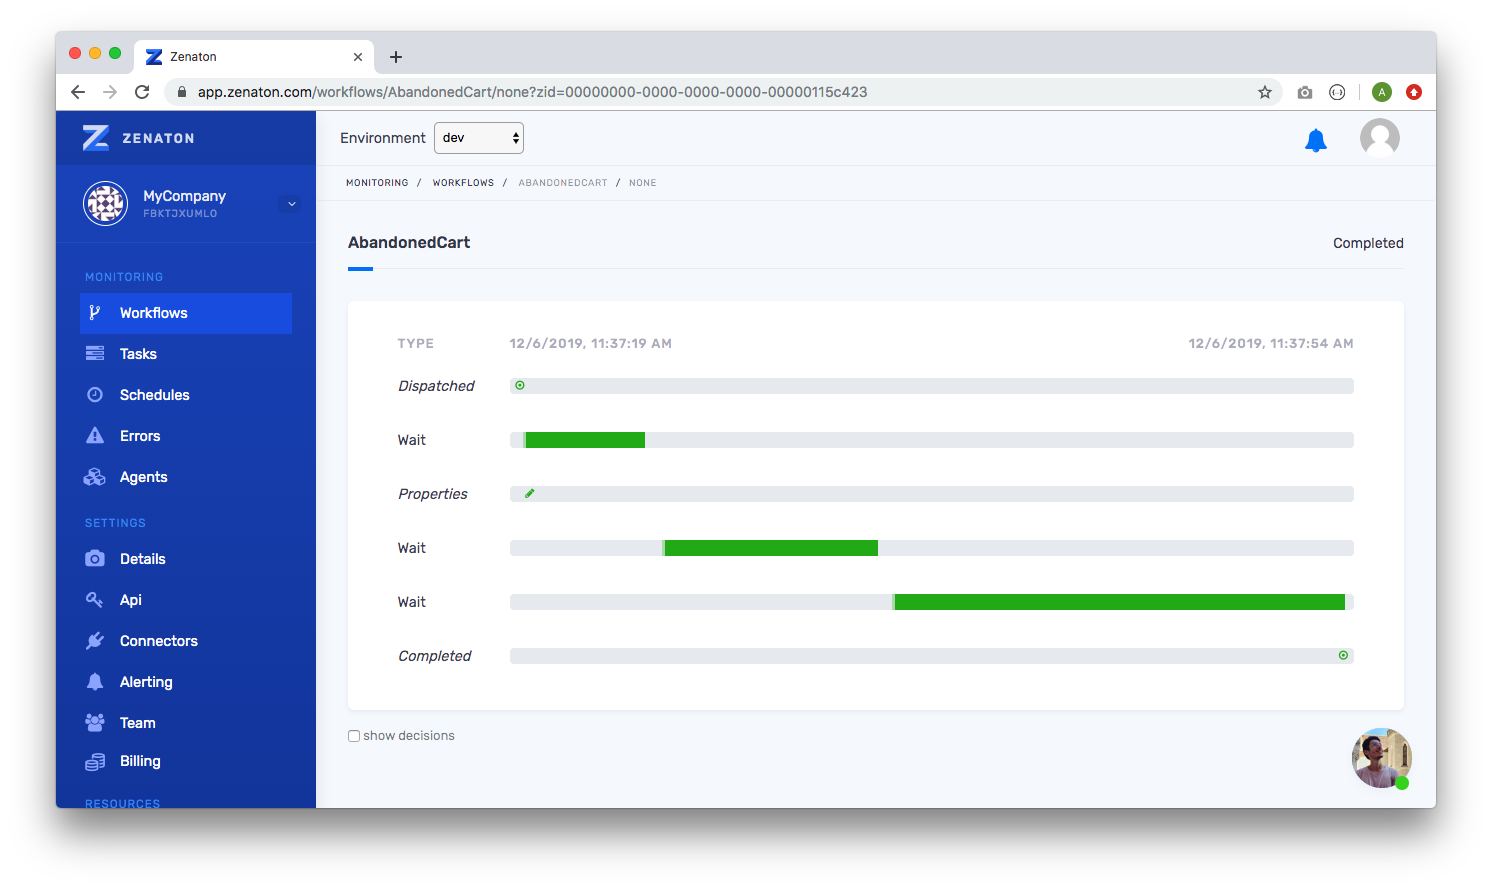
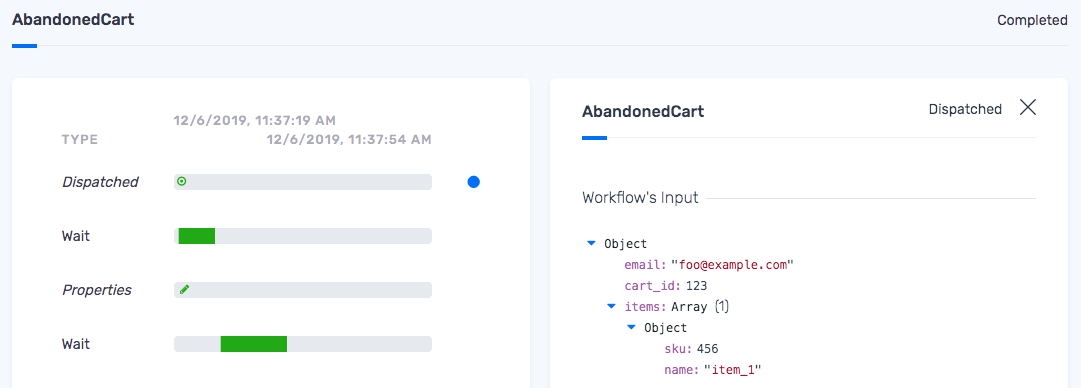
Once the workflow is launched, check the real-time executions on your dashboard, click on the "AbandonedCart" card and on the first progress-bar line, you will see a live summary of what's the execution:

Click on the "dispatched" step to view the input parameters, you see the cart data that we use to start the instance.

Click on the first wait row.

2) Properties On the dashboard execution, you may have seen the step "Properties". If you click on it, you will see the cart again:

It's because in the code at the beginning of the code, we did this:
// holds the last version of the cart
this.cart = cart;
From a code standpoint it's a regular object instance attribute.
The benefits here of using properties against a regular local variable is that you can access it from all functions of the workflow of course, but more interesting: all their mutations appear in the dashboard in a step called "Properties".
This is useful to track what happened during the execution, but also to see the history of mutations afterward.
Note: properties rows are added only when they change.
Let's send an updateCart event to see it's property being updated.
3) Send an updateCart event
Our workflow is now running and waiting for the 'checkout' event in the main handle function. So its execution is suspended. But using the onEvent function, the workflow can still react to events to trigger steps or change the workflow properties.
As you can only send events to running workflow instances, you may have to start a new instance of the workflow if the previous one is completed.
Start a new instance
curl -X POST https://gateway.zenaton.com/rest-api/v1/instances \
      -H "Content-Type: application/json" \
      -H "Accept: application/json" \
      -H "app-env: dev" \
      -H "app-id: FBKTJXUMLO" \
      -H "api-token: Bt29HVlvrY9atH41LNwnAp5MQYkEut8oCqXKH8NGOjUAtJltB6Sea82FbP2P" \
      -d '{"name":"AbandonedCart","input":\[{"email":"[email protected]","cart_id":123,"items":[{"sku":456,"name":"item_1"}]}],"version":"v1"}'
Copy the id from the response, here 32766318-c936-43ca-9869-9b4450c29b8f
{
  "workflow": {
    "canonical_name": "AbandonedCart",
    "id": "32766318-c936-43ca-9869-9b4450c29b8f",
    "input": "[{\"cart_id\":123,\"email\":\"[email protected]\",\"items\":[{\"name\":\"item_1\",\"sku\":456}]}]",
    "name": "AbandonedCart_v1",
    "programming_language": "javascript"
  }
}
Send the "updateCart" event
This will simulate that the customer adding a second item to the cart.
curl -X POST https://gateway.zenaton.com/rest-api/v1/instances/32766318-c936-43ca-9869-9b4450c29b8f/event \
  -H "Content-Type: application/json" \
  -H "Accept: application/json" \
  -H "app-env: dev" \
  -H "app-id: FBKTJXUMLO" \
  -H "api-token: Bt29HVlvrY9atH41LNwnAp5MQYkEut8oCqXKH8NGOjUAtJltB6Sea82FbP2P" \
  -d '{"name":"updateCart","data":[{"items":[{"sku":456,"name":"item_1"},{"sku":789,"name":"item_2"}]}]}'
Here is the event payload in details. It's composed of a name "updateCart", and some data, here the latest cart:
{
  "name": "updateCart",
  "data": [
    {
      "items": [
        { "sku": 456, "name": "item_1" },
        { "sku": 789, "name": "item_2" }
      ]
    }
  ]
}
This event will trigger the onEvent function of the workflow that will update the cart property
  *onEvent(name, data) {
    if (name === "updateCart") {
      this.cart = { ...this.cart, items: data.items };
    }
  },
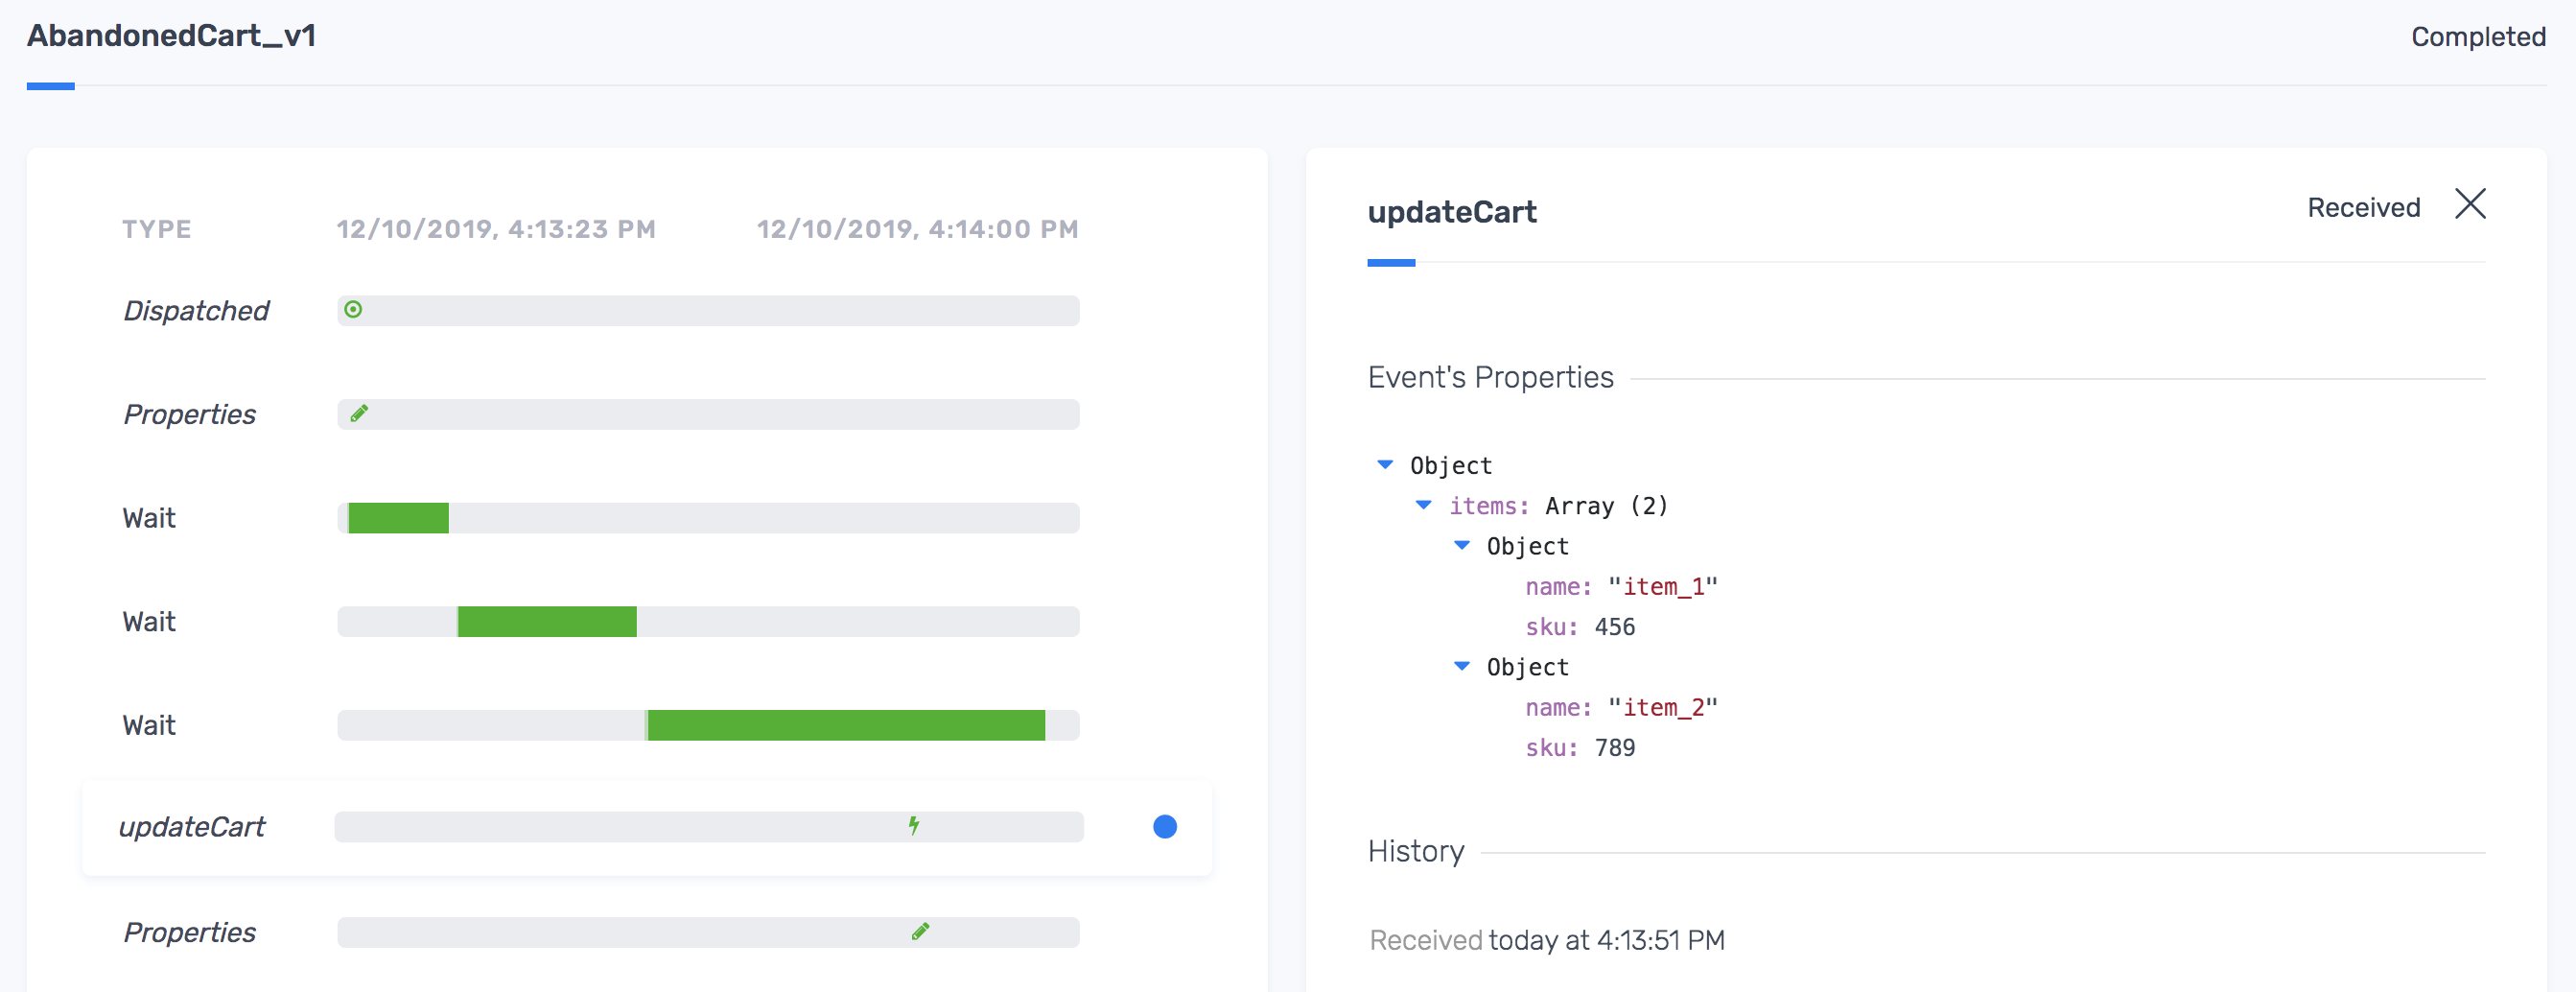
On the dashboard, you will see the step dedicated to this event "updateCart", you will also see it's associated data: the latest cart

As the cart property has changed, there is also a new "Properties" step to show our cart property updated with the latest cart.
These events would normally be sent from our application code using the Zenaton SDK or via HTTP.
4) Send a checkout event
You can now send the checkout event whenever you want, and then see the outcomes on the workflow executions.
curl -X POST https://gateway.zenaton.com/rest-api/v1/instances/32766318-c936-43ca-9869-9b4450c29b8f/event \
  -H "Content-Type: application/json" \
  -H "Accept: application/json" \
  -H "app-env: dev" \
  -H "app-id: FBKTJXUMLO" \
  -H "api-token: Bt29HVlvrY9atH41LNwnAp5MQYkEut8oCqXKH8NGOjUAtJltB6Sea82FbP2P" \
  -d '{"name":"checkout","data":[]}'
5) Explore the different logic paths
Launch the workflow again and wait before sending the checkout event to test different paths.
Ideas for adding logic
You can add a minimum threshold on the total amount of the cart to handle only carts with higher value, and notify the customer success team to provide assistance to the customer or propose different payment methods, ...
You can send an email with some similar products, offer alerting on price changes, or when out of stock items become available..
Sample Projects
Start building workflows
Sign-up and run a sample project Learn more
- Manage cookies
- Terms of Service
- © 2019, Zenaton. All Rights Reserved.