View the github project where you, fork the project and deploy to heroku in a few clicks.
In this tutorial, you'll learn how to:
- Launch a workflow using the Zenaton API
- Use the wait function with external events
- Send event to a running workflow using the Zenaton API
- Use the Sendgrid SDK to send email (optional)
Workflow Description
The workflow starts when a user invites 5 friends to purchase an "Awesome Cheesecake" Deal. If at least 3 friends purchase the deal then the user receives a refund for their deal purchase.
Our workflow will wait for up to 3 of the 5 friends to purchase the deal at which point it will refund the user their payment so that they receive the deal for free.
Requirements
- A Zenaton Account so you can get your Zenaton APP ID and API token .
- (Optional) Sendgrid account and a Sendgrid API key.
Steps in the tutorial
- Launch a workflow instance for the user when they invite friends.
- Send the first event and view the event details on the dashboard.
- Add and send 2 more events for friends that purchase a deal.
- Refund the deal to the user using a task.
- Modify the workflow logic to count only unique email addresses (friends).
- Send an email using the Sendgrid connector to notify the user of their refund.
1) Launch the workflow
A workflow instance is started when a user invites 5 friends to buy their deal.
It will be launched with the following data input that contains the email and the deal of the main user:
{
  "id": 123,
  "email": "foo@example.com",
  "deal": "awesome cheese cake"
}
There are a couple of ways to launch the workflow:
From within your application
Launch a workflow instance within your application code using an HTTP client to send a request to the Zenaton API.
If your application is written in Node.js, you can also launch a workflow from within your application using the Zenaton Node.js SDK.
Quick Launch (for testing)
A quick way to start the workflow is by using the curl command in a terminal. Make sure to replace <YOUR APP ID> and <YOUR API TOKEN> placeholders by your Zenaton APP ID and API token in the following command before using it:
curl --request POST \
      --url https://gateway.zenaton.com/graphql \
      --header 'authorization: Bearer ' \
      --header 'content-type: application/json' \
      --data '{"query":"mutation ($input: SendEventToWorkflowsInput!) {\n  sendEventToWorkflows(input: $input) {\n    status\n  }\n}\n","variables":{"input":{"appId":"","environment":"dev","name":"deal_purchased","data":"[{\"deal_name\": \"awesome cheese cake\",\"email\": \"friend_1@example.com\"}]","selector":{"name":"ReferAFriend","tag":"123"}}}}'
We also defined a tag with an arbitrary value of 123 (which is the same as the user ID we are using in our workflow input) when starting the workflow. It will be used later to be able to send events to this workflow.
The purpose of the workflow is:
- If at least 3 friends also purchase the deal then the user is credited for their payment and gets it for free.
Waiting for the first event
So the first step is to wait for 3 friends to buy a deal (the deal_purchased event).
We've added the wait function on the "deal_purchased" event in a loop.
The wait function will suspend the the workflow execution until all three events are received.
  // Initialize the counter of friends that have purchased a deal.
  let nb_friends = 0;

  // Loop until 3 friends purchase a deal.
  do {
    // Wait for the deal_purchased event
    yield this.wait.event("deal_purchased").forever();
    nb_friends++;
  } while (nb_friends < 3);
View the workflow executions
Once the workflow is launched, check the executions on your dashboard, click on the "ReferAFriend" card and on the first progress-bar line, you will see a live summary of the steps.

Click on the "dispatched" step to view the input parameters and you can also see the first wait of the loop.
2) Send Events
The workflow is running and waiting for the deal_purchased event which will be sent when a friend purchases the deal.
There are a couple ways that the events are sent to a running workflow:
From inside your application:
- You can send an event to a workflow instance within your application code using an HTTP client to send a request to the Zenaton API.
- If your application is written in NodeJS, you can send events using the Zenaton Node.js SDK.
Quick Test
A quick way to send an event is by using the curl command in a terminal. Make sure to replace <YOUR APP ID> and <YOUR API TOKEN> placeholders by your Zenaton APP ID and API token in the following command before using it:
curl --request POST \
  --url https://gateway.zenaton.com/graphql \
  --header 'authorization: Bearer <YOUR API TOKEN>' \
  --header 'content-type: application/json' \
  --data '{"query":"mutation ($input: SendEventToWorkflowsInput!) {\n  sendEventToWorkflows(input: $input) {\n    status\n  }\n}\n","variables":{"input":{"appId":"<YOUR APP ID>","environment":"dev","name":"deal_purchased","data":"[{\"deal_name\": \"awesome cheese cake\",\"email\": \"friend_1@example.com\"}]","selector":{"name":"ReferAFriend","tag":"123"}}}}'
Here is the event payload in details. It's composed of a name deal_purchased, and some data: some details about the friend that buys a deal:
{
  "name": "deal_purchased",
  "data": [
    {
      "deal_name": "awesome cheese cake",
      "email": "friend_1@example.com"
    }
  ]
}
The `data` property expects a JSON array encoded as a string (that's why the double quotes are escaped), and this array can contain any JSON compatible value. You can use it to pass any data that makes sense for your events.
Workflow Executions
Check the dashboard again and you will see that new row has appeared in workflow execution as well as the next wait in the loop. Click on the event to see the associated data (user_id and email)
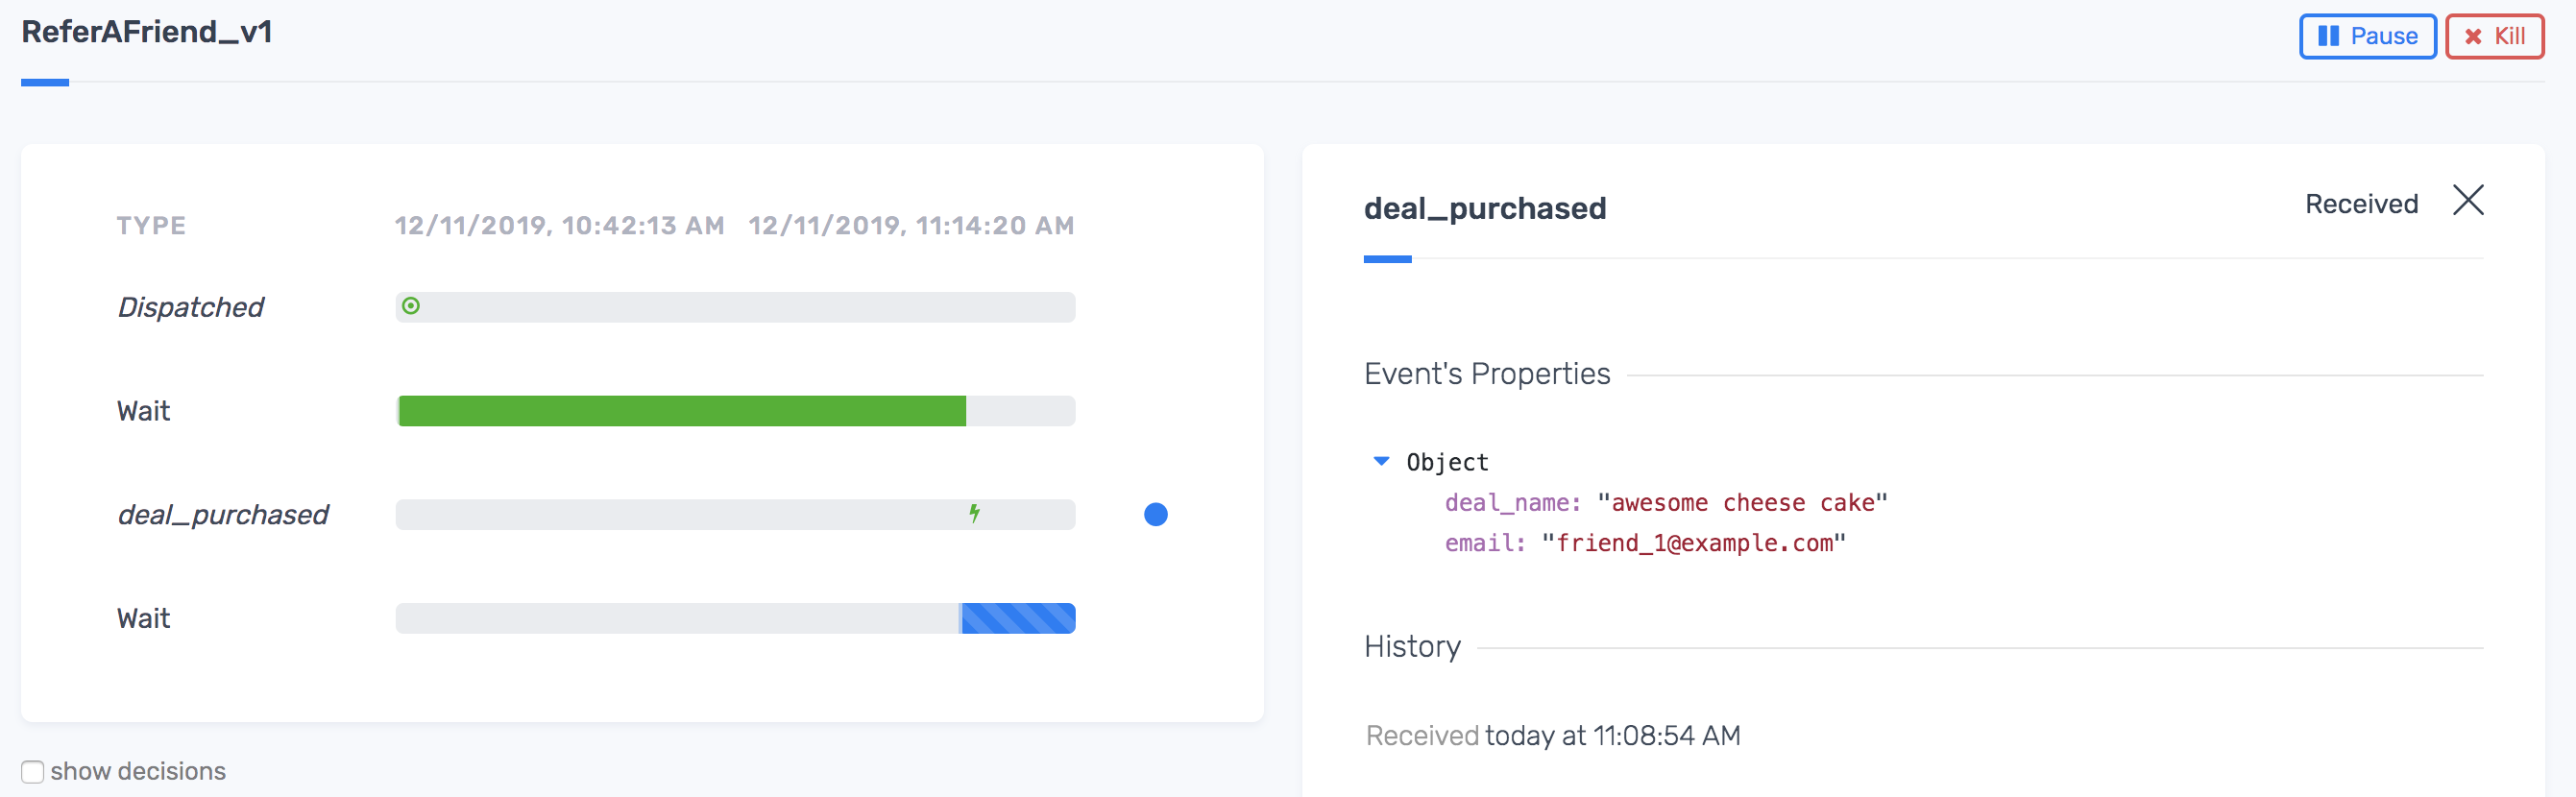
When the first deal_purchased event is received by the waiting workflow, the workflow stops 'waiting' and resumes and starts the next step - which is the beginning of another wait inside the loop.
3) Send Events for Friends 2 and 3
Now, to simulate two more friends purchasing the deal, modify the parameters of the event to add their email address and ID.
Send each event to the workflow.
Once three friends have purchased the deal, the loop ends and the next step will be executed - crediting our user for their deal so that they get it for free using the Refund task.

4) The refund task
Zenaton tasks can added as steps inside a workflows. Tasks can be used to call 3rd party APIs or internal APIS, use 3rd party SDKs, or any npm package
The Refund task here is using Axios to send an HTTP request to a fake API endpoint, but you would normally make a request to your own API or the API of your payment provider in order to issue the refund. If your payment provider has a NodeJS SDK, you can also use it in your task. Here is the code for our Refund task:
const axios = require("axios");

module.exports.handle = async function(user) {
  // this is a fake task doing an HTTP request on a fake endpoint for the example's sake.
  // in a real project, you should make a request to an endpoint in your application or
  // to your payment gateway API.
  await axios.put("https://httpbin.org/anything/refund", { body: user });

  console.log(`A refund has been granted to user ${user.email}.`);
};
Now, check the Zenaton dashboard for a new row labeled Refund. Click on it to see details and task input and output. This task has no output because we did not return anything from the handle function.
5) Modify Workflow Logic
Now that you are familiar with this workflow, lets make a few changes to the logic and run it again.
Prevent one friend from buying the deal multiple times
You might have noticed that the actual logic in the loop is quite naive: there is no check on the user email to make sure that one friend isn't buying the deal multiple times.
So we'll check the user email coming from the event data to count only distinct emails.
Replace the current loop with the following:
  // initialize the set of friends that have purchased a deal.
  let friends = new Set();

  this.log(`Starting workflow ReferAFriend for user ${user.email}.`);

  // loop until 3 friends purchase a deal.
  do {
    // wait for the deal_purchased event.
    const [, event_data] = yield this.wait.event("deal_purchased").forever();
    // get the friend's email from the event data received and add it to the set.
    friends.add(event_data.email)
  } while (friends.size < 3);
Launch and Test the workflow:
Launch the workflow again and when you send 3 events this time, send two of them with the same parameters. Note that the second time the workflow receives an event with the same parameters, it will not resume and will continue waiting. Now enter the third event with the correct parameters and the workflow will resume and advance to the final step to refund the user.
5) Send Email with Sendgrid API connector (Optional)
We've written the SendEmail task to send the email when the SENDGRID_API_KEY environment variable is provided. If your running this tutorial locally or using Docker, make sure to write your Sendgrid API key in the .env file if you are running this tutorial locally or using Docker, or in your Heroku config variables if you're running it on Heroku.
Here is the code of the SendEmail task:
const sendgrid = require('@sendgrid/mail');

/**
 * Retrieve the Sendgrid API key from the environment.
 *
 * @returns {(string|undefined)}
 */
const getSentryApiKey = function() {
  if (typeof process.env.SENDGRID_API_KEY === "string" && process.env.SENDGRID_API_KEY.length > 0) {
    return process.env.SENDGRID_API_KEY;
  }

  return undefined;
};

module.exports.handle = async function(user) {
  const sendgridApiKey = getSentryApiKey();
  // if the sendgrid api key is not provided, we don't send any email.
  if (!sendgridApiKey) {
    console.log(`Email notification to ${user.email} has not been sent because no Sendgrid API key was provided.`);

    return false;
  }

  sendgrid.setApiKey(sendgridApiKey);

  // send an email using the Sendgrid SDK.
  await sendgrid.send({
    personalizations: [{ to: [{ email: user.email }] }],
    content: [
      {
        type: "text/plain",
        value: "Congratulations, you have received a refund..."
      }
    ],
    subject: "Deal refund",
    from: { email: "zenaton-tutorial@zenaton.com" }
  });

  return true;
};
Re-Launch Workflow
Before launching the workflow again, you will need to update the workflow input, to update the user email with yours to be able to receive the email.
So, replace <YOUR EMAIL> by yours in the following curl command:
curl --request POST \
  --url https://gateway.zenaton.com/graphql \
  --header 'authorization: Bearer ' \
  --header 'content-type: application/json' \
  --data '{"query":"mutation ($input: DispatchWorkflowInput!) {\n  dispatchWorkflow(input: $input) {\n    id\n  }\n}\n","variables":{"input":{"appId":"","environment":"dev","name":"ReferAFriend","input":"[{\"id\": 123,\"email\": \"\",\"deal\": \"awesome cheese cake\"}]","tag":"123","version":null}}}'
Run the workflow again and send 3 "purchased_deal" events to trigger the deal credit and email. Then, check your email to see if you received the email.
Want to play around with the workflow? Here are some ideas. You can write any logic you please using plain javascript and the Zenaton functions to control the timing and flow.
- add a deadline for each friend to buy their deal.
- check that the deal price is in the same range
- add email reminders if the friends don't respond within 3 days.
Workflow Code
Here is the full workflow code. View the github project to fork and deploy to heroku in a few clicks.
module.exports.handle = function*(user) {
  // initialize the counter of friends that have purchased a deal.
  let nb_friends = 0;

  this.log(`Starting workflow ReferAFriend for user ${user.email}.`);

  // loop until 3 friends purchased a deal.
  do {
    // wait for the deal_purchased event. every time we receive this event, we increment the counter.
    yield this.wait.event("deal_purchased").forever();
    nb_friends++;
    this.log(`A friend of user ${user.email} has purchased a deal.`);
  } while (nb_friends < 3);

  // trigger the refund to the user in your application.
  yield this.run.task("Refund", user);

  // send an email to user.
  yield this.run.task("SendMail", user);
};Start building workflows
Sign-up and run a sample project Learn more
Zenaton
Product
Resources
Zenaton Examples