Let's simulate a web application that waits for events and triggers personalised emails to our users when they complete each milestone (Installation and Activation). Our example is based on a Zenaton new user journey but can easily be configured to send emails and trigger actions based on any events within an app or in external services.
Why Activation is so important
Before going into the code, let's explain how this workflow can be useful for you.
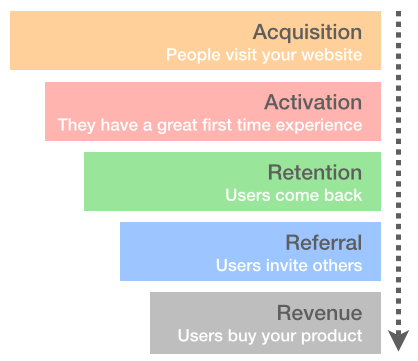
Going back to the basics, the user journey can be segmented in 5 steps that this image sums-up:

In this user journey, one of the most challenge for a lot of early stage start-ups is the activation layer because it's crucial to succeed in showing them the value they expect after they see your website. If not, you will lost them and lost the opportunity to start engagement and relationship with them.
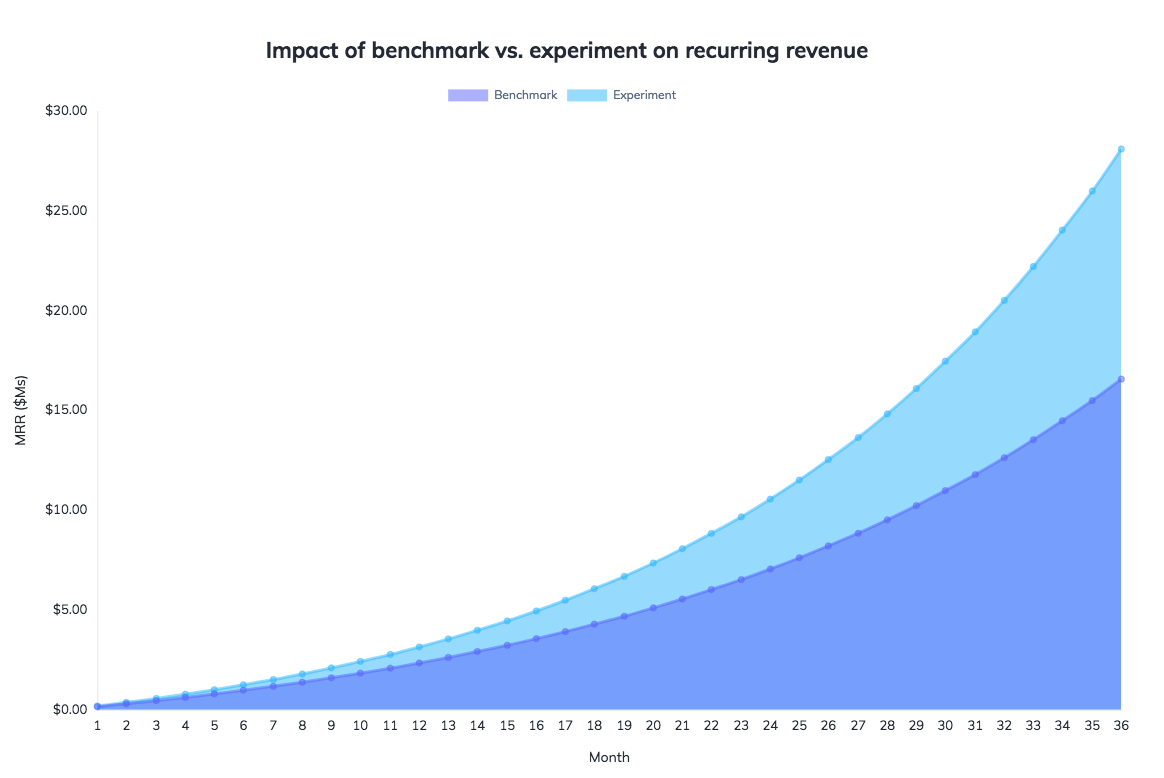
Any action that tends to activate the user on your platform is a step toward success. You want them to enjoy your aha moment that will incite them to be a customer. It's particularly true for SaaS startups where a small increase of 7.5% in activation rate has a big impact on monthly recurrent revenue.

We will not discuss about the other parts of the funnel. The metrics of the other layers mostly depend on acquisition and activation. That's why activation is so important in your strategy and we're not calculating the side-effects that the activation increase can have on others: it results in increases in retention and referrals, too - making the increase in MRR even greater.
Make non-technical people more autonomous
It is often difficult for non-technical people to have the opportunity to change email's parameters such as body, subject or something else. Because they have to deal with the tech team and wait for their availability to add change that could impact the activation rate.
In this example, we simplify the usual process by letting non-technical people easily change email's parameters and consequently giving them more autonomy to act on their business metrics.
- The tech team will code Zenaton Workflow and know templating engine.
- The designer team will create the beautiful html template.
- The sales or marketing will be able to modify the email's parameters in Airtable as much as they want. And do A/B testing if they wish.
How to do that ? By "connecting" a spreadsheet SaaS (here Airtable) to an email sender SaaS (here Sendgrid) ! Zenaton allows you to aggregate services that you already have or want to use.
Workflow Logic : User Activation
When a new user registers, we start a NewUserWorkflow for that user.
This workflow will send emails based on user's behavior. It can run for days, months or even longer. Each action of the user will send events that will be handle by this workflow.
Consequently, you will be able to personalise his experience on your website based on his journey. The content of your emails will change according to the events that happen.
In our example, we send 2 events to our workflow to trigger activities (agent_installation and tasks_launched). At Zenaton, it's a key performance indicator to know if a user installed an agent - as if not he cannot fully benefit Zenaton - and to know how many tasks he launched.
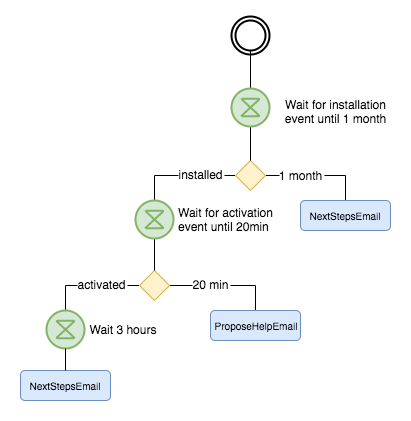
The flowchart represents sequentially the steps :

Introduction to the Zenaton Workflow
We use several Zenaton functions in our workflow such as wait.event() and wait.for(duration()) as well as connectors to manage the authentication for Sendgrid and Airtable. Emails are sent with Sendgrid and it's possible to modify email content using Airtable.
In this example, 2 events are sent to the workflow to trigger activities: installation and activation
Step by step executions:
- Wait for the user to install the agent until 1 month
- If the event is not received in this period, then it sends an email to suggest the user next steps
- If the event is received, then it waits for the user to execute tasks within 20 minutes.
- If no tasks have been executed, then it sends an email to offer help
- If tasks have been executed, then it waits 3 hours before sending an email
Here is the main function of the NewUserWorkflow:
const { workflow, duration } = require('zenaton')

module.exports = workflow('NewUserWorkflow_basicEmail', function* (user) {
  // Wait a maximum of 1 month the user does the installation. (We will use 30 sec in dev)
  const installation_event = yield this.wait.event("installation").for(duration.seconds(30))
  if (null === installation_event) {
    // The user have not installed the agent within 1 month.
    // Send an email to encourage the user to do the tutorial.
    yield this.run.task('SendEmailWithSendgrid', {
      email: user.email, subject: 'What are the next steps ?', content: 'Have you seen our tutorial ?'
    })
  } else {
    // Once the user installed the agent. Wait a maximum of 20 minutes the user do the activation (We will use 20 sec in dev)
    const activation_event = yield this.wait.event('activation').for(duration.seconds(20))
    if (null === activation_event) {
      // The user did not do the activation within 20 minutes.

      // Send an email to propose some help.
      yield this.run.task('SendEmailWithSendgrid', {
        email: user.email, subject: 'Need some help ?', content: 'TDB'
      })
    } else {
      // The user installed the agent and did the activation.
      yield this.wait.for(duration.seconds(3)) // (We will use 3 sec in dev)
      // Send an email to congratulate the user and give him resources for real examples.
      yield this.run.task('SendEmailWithSendgrid', {
        email: user.email, subject: 'What are the next steps ?', content: 'Look at our real-world example ...'
      })
    }
  }
})
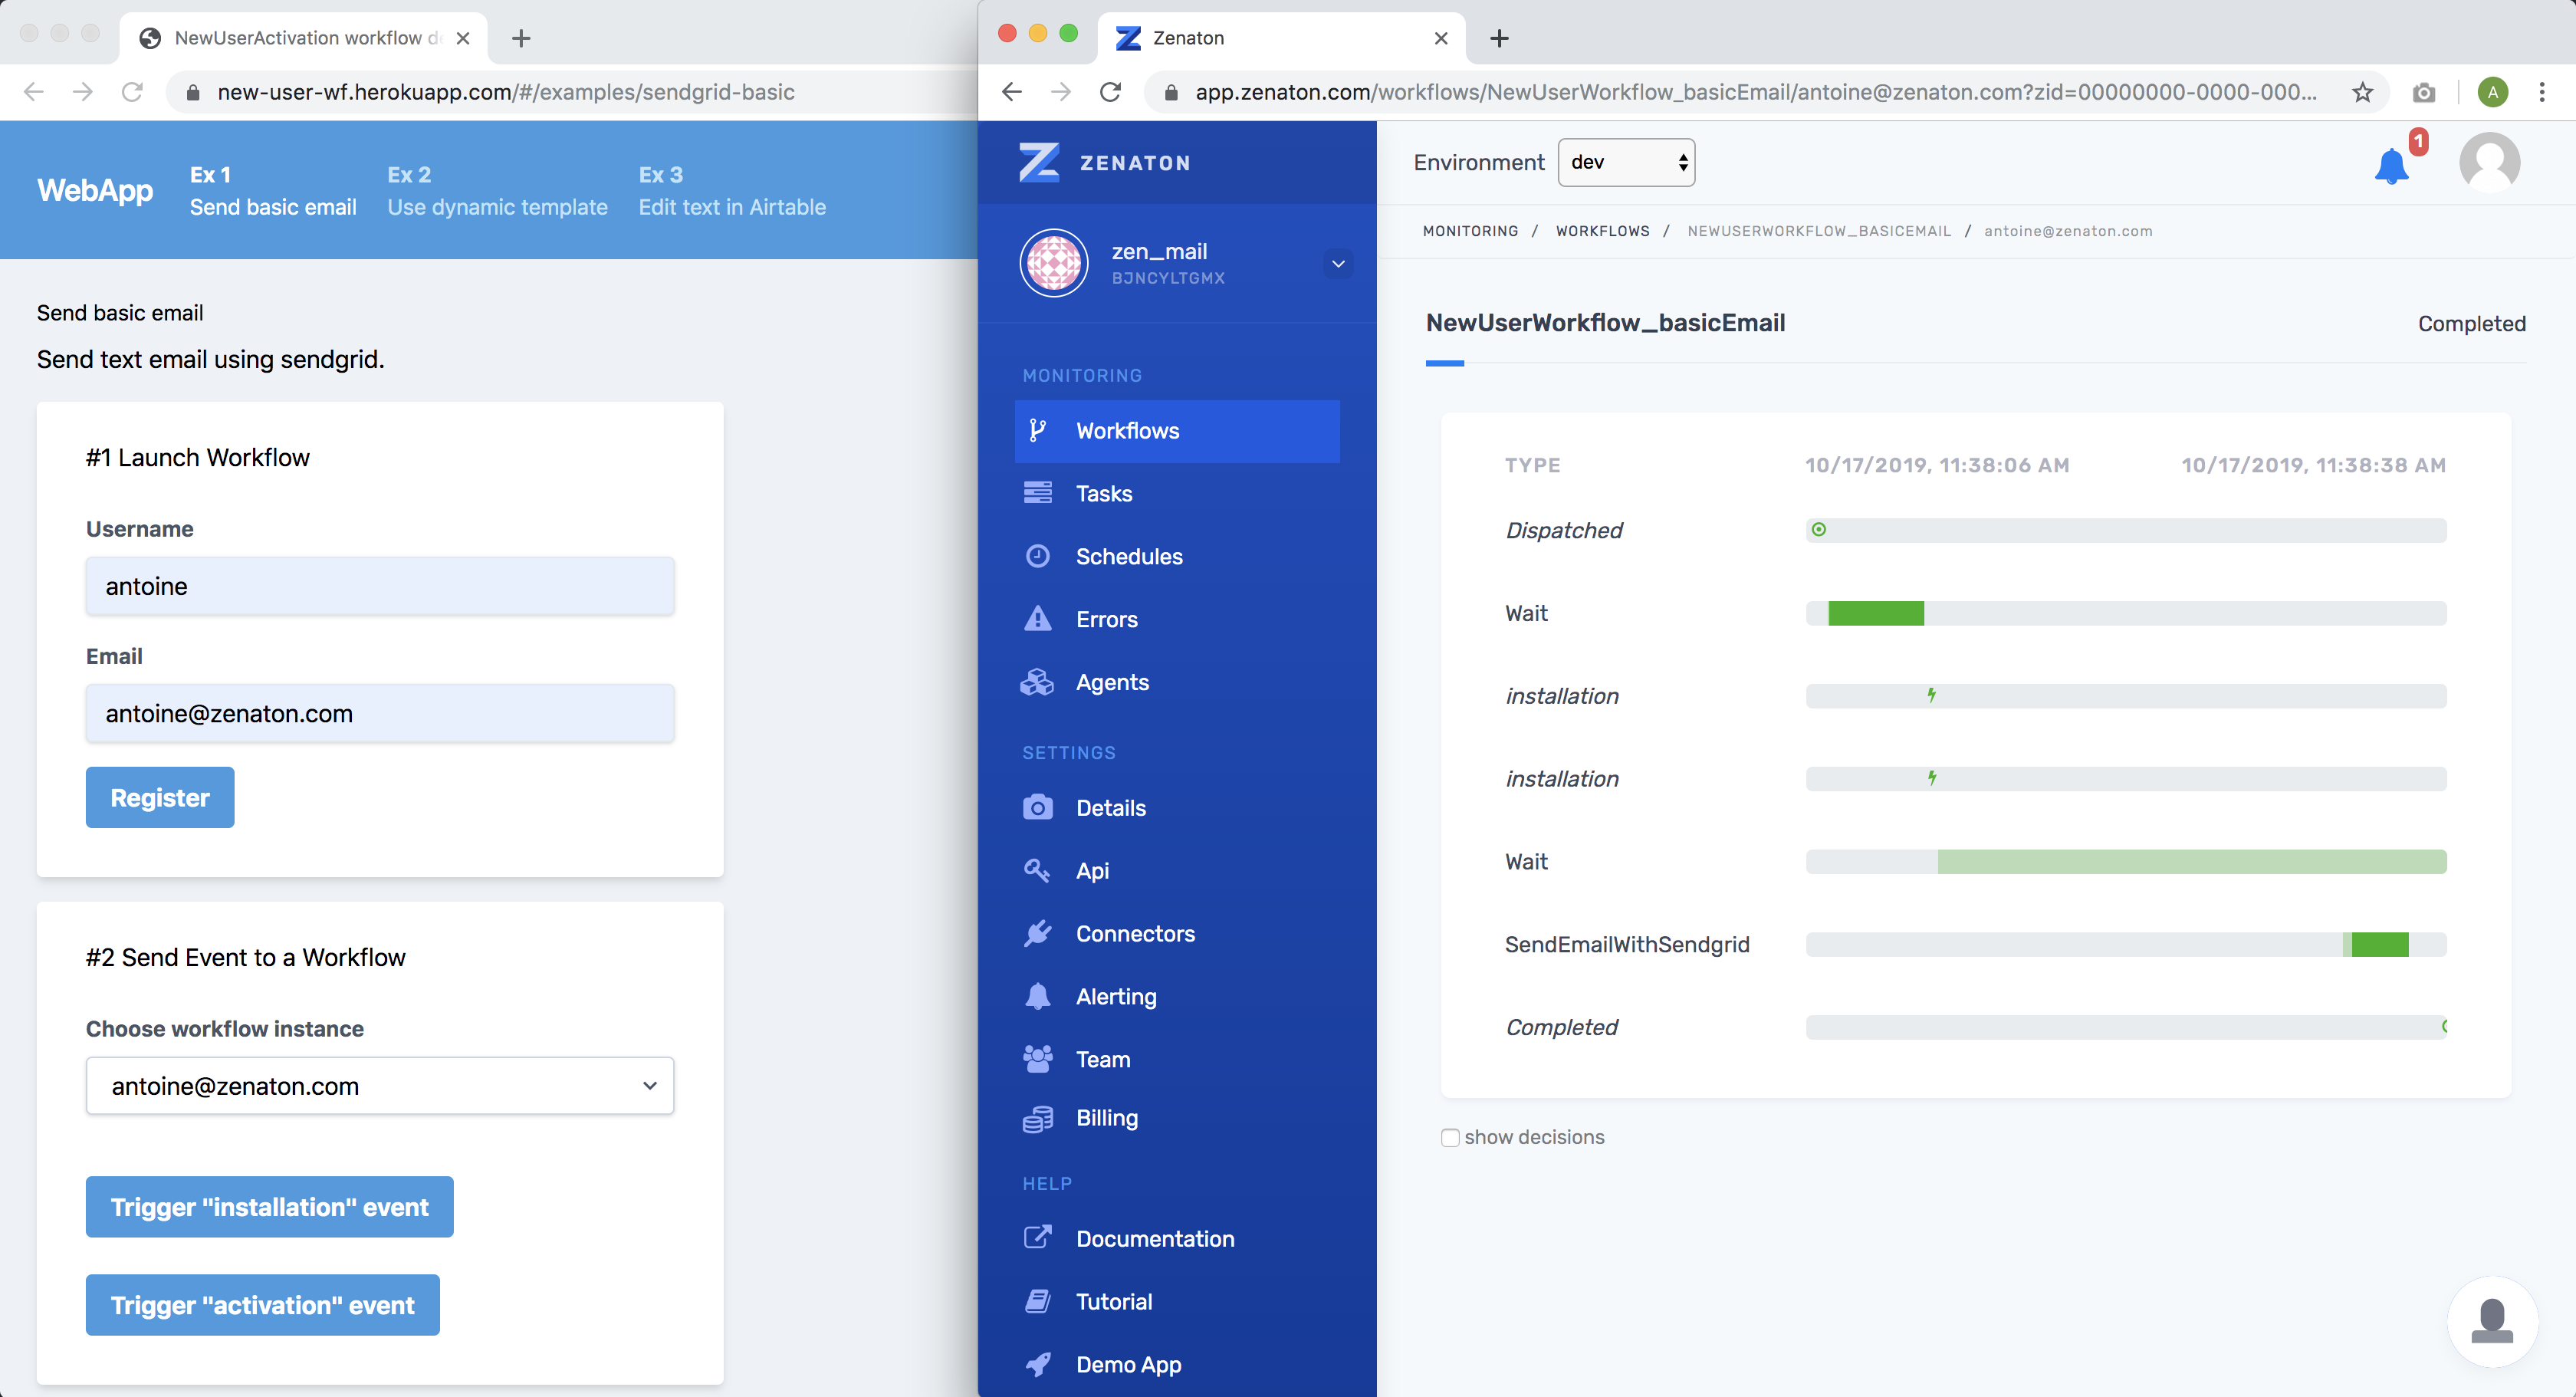
Simulation of a web app for testing
We've provided a simple UI in the web_app that allows you to simulate the user events - installation or activation - to trigger actions in the workflow and see the corresponding tasks executions on your Zenaton dashboard:

Deploy & Test the activation user workflow
All requirements are explained in a Github repo showing you how to deploy the workflow. The Github repository is split into two directories:
- web_app: a simple NodeJS web app where we launch the workflow instance per user when they register and send events when the user installs or runs their first workflow.
- worker: Runs the workflow and tasks and receives the events for each workflow instance.
There are three possibilities for the deployment: Heroku, Docker or locally.
Each possibility is detailed in the Github repo.
